
It doesn’t matter whether you are a beginner or a well seasoned carver, you make mistakes or have accidents. Sometimes you can anticipate such events and an ounce of prevention is worth it’s weight in gold. Sometimes, it is completely unexpected, and you have to find a way to repair it, change your original plan, or chalk it up to experience and start all over. As long as you come away learning something from the event, was it really a mistake?
I like to work with found wood. It is often small so I do a lot of miniature carvings. Some are only four inches long. Before I start carving in bark, I thoroughly clean the piece and flatten the back. Then I study the bark for any cracks or defects. If I find any, I ask myself if they can be worked into the design or do I need to repair before starting.
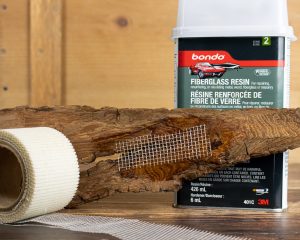
Reinforcing Bark Before Carving
Small cracks can be spread open and with a little finger pressure and a little CA (cyanoacylate) glue run into the crack, then release the pressure. Be very careful not to get CA glue on your hands; use gloves and clean any excess off with a toothpick and discard it safely.
To avoid problems while working with bark, use sharp chisels and knives. Bark is soft and will compress and tear with dull tools. Make short, shallow cuts with light pressure at a shallow angle. Strop knives frequently and use stop cuts whenever possible.
If the bark piece you wish to work with is fragile but has character and you want to use it, the back can be reinforced. With fiberglass cloth and resin applied, weak areas can be strengthened. This process will add weight to the piece. The technique can be made lighter by using self adhesive fiberglass mesh drywall tape. Working in a well ventilated area, coat the back of the bark in the area you wish to reinforce with fiberglass resin (prepared using the manufactures instructions). Lay the mesh tape on top of the resin, pushing it gently into place. Add more resin over top of the tape. Use a scrap piece of plastic to smooth the resin before it drys. The tape is easy to cut with scissors before applying the resin and it is best to not have mesh overhanging the piece. Set the work aside and let it fully cure before starting to work on the piece.
If chips break, ask yourself if this can be worked into the design? If the answer is no, use CA glue to repair the break. The bark absorbs the glue quite readily so I use the gel formula. Larger breaks can be repaired with fast drying carpenters glue. Clamp the repair if possible when using carpenters glue and remove any excess glue. Filler can be used for large repairs. Make your own filler with a mixture of carpenters glue and bark sawdust. Mix the glue and sawdust into a paste and push the filler into the areas needing repair. If the hole you are working on goes through to the back, push the filler from the back. Carefully clean any excess filler off the piece, then shape it after it dries.
There are probably lots of good ideas out there for repairs but I have found these techniques work for me.
Next time, Carving Miniatures…